How to clean HP printer heads

If you've had a printer for a long time, you won't be surprised when we tell you that they require some maintenance. The worst times, errors appear that we don't know where they come from or how to fix, the best times, the problem is solved with something as simple as a printhead cleaning.
Do your printouts have defects such as streaks, discoloration, white space or blurred text, are your cartridges full but the ink is not flowing onto the paper? Often this is due to a dirty or clogged print head. If you have an HP printer we tell you step by step how you can carry out the cleaning. Spoiler: it's so easy that even the most clumsy person will be able to do it.
If you want to know other reasons why these printing defects occur, you can read the following articles:
From the printer control panel
The first thing to keep in mind is that cleaning the printheads wastes ink, so perform a nozzle test first to make sure this is where the problem is. Now, to perform the cleaning from the printer control panel, perform the following steps:
- Load white paper into the printer's input tray.
- Press and hold the 'Power' button ().
- Press the 'Cancel' button () twice, and then press the 'Resume' button () once.
- Lastly, release the 'On' button ().
From HP Solution Center
Another option is to run the printhead cleaning from the HP Solution Center application included in the printer software package. How:
- The first thing you should do is open HP Solution Center. From Windows XP click on 'Start', 'All Programs', 'HP' and then HP Solution Center. From Windows Vista, click on the Windows icon (), then 'All Programs', 'HP' and finally HP Solution Center.
- HP Solution Center will open in a new window. Click 'Settings' (), then click on 'Printer Toolbox'.
- Once the Printer Toolbox is open, click on the 'Device Services' tab, and then click on 'Clean Printheads.
- Click on 'Clean' to begin the cleaning process, then follow the on-screen instructions to complete the process.
- Once the cleaning is complete a test page will be printed.
Manually
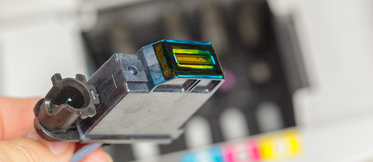
If you have already performed the cleaning through the printer's control panel or through the HP Solution Center application and the problem remains unsolved, you can do it manually. As explained by HP technical support, it is important to be careful when handling the cartridges and print head because they are easily damaged.
- Turn on the printer and open the access door (this varies depending on the model).
- The printer carriage will move to the centre and you will be able to access the print head and cartridges.
- Wait until the cartridges have stopped moving before unplugging the device, approximately 3 seconds (this keeps the printer carriage in one place so you can remove the clogged printhead).
- Remove the cartridges by lifting or pushing the tab that holds them in place and pulling them out (remove them one at a time and try not to leave them out of the printer for more than 30 minutes).
- Place the cartridges on a clean piece of paper on their side, making sure that the nozzle points away from any surface.
- Now take a lint-free cloth and wipe off any excess ink from the contacts on the bottom of each cartridge, but do not wipe or touch the nozzle.
- The contacts should point away from any surface to avoid damage and the nozzle should not point downwards, otherwise it may cause the rest of the ink to drain out (it is best to lay it on its side).
- If ink remains on the contacts, use a cotton swab with bottled water to gently wipe them. Never use alcohol.
- Wipe the contact point dry with a clean cotton swab or let it air dry for 10 minutes.
- Once the cartridges are clean, clean the print head.
- Find the contact points on the print carriage inside the printer and wipe them gently with a lint-free cloth.
- Make sure there is no ink left on the printer contacts.
- As with the ink cartridges, if you have difficulty removing excess ink, use a cotton swab and mineral water.
- Wait about five minutes for the print carriage to dry and then reinsert the ink cartridges back into the printer.
- Put them in place and make sure they are secure before plugging in the power cord.
- Close the print head cover and wait for the initialisation process to complete before attempting to print any documents.
If you have come this far, we are sure that you have managed to clean the HP heads. Remember that in Webcartridge you can buy compatible and original consumables for your HP printer.